Page copy protected against web site content infringement by Copyscape

Friday, April 13, 2007

Try fixing your computer yourself as a last resort

THE USER WHO FIXED HIS OWN COMPUTER (AND LIVED TO TELL THE TALE)

You've tried escalating your tech-support concerns to the top of the food chain. You've threatened to call the Better Business Bureau. You've even sent boxes of candy to all the techies you've talked to in an attempt to sweeten them up. But still, you can't get your tech-support problem solved. When all else fails, you may need to overcome your personal fear factor and take matters into your own hands.

Casting out the ghosts in your machine doesn't have to be terrifying, provided you follow a few simple steps.


1. Before you dig in, see if other vendors can help. Got display problems? Call your video card maker. You say your Wi-Fi connection won't fly? Try the company that makes your wireless card. Best Buy maintains a directory of support numbers for hundreds of manufacturers. At the very least, support FAQs on vendor Web sites might provide some clues.


Has your system gone psycho? It may be due to an outdated hardware driver. Use XP's Device Manager to check on drivers for key components and update them.
2. Make sure your hardware is using the latest drivers. Video card drivers in particular can be a source of many conflicts. In Windows XP, open the Control Panel, launch System, click the Hardware tab, and click the Device Manager button. Double-click a device category to expand the list, then double-click the name of a device. Select the Driver tab and click Update Driver. (If that makes matters worse, you can click the Roll Back Driver button to go back to the previous one.)

3. Update whenever possible. New bugs are constantly being discovered (and swatted), so make sure your software is up to date. Certain credit cards run Windows Update and install any updates marked "critical." Check whether other software you use offers update options; it can often be found under the Help or Tools menus.

4. Google your gripes. If you're getting an error message, type the exact message inside quote marks in your favorite search engine. Odds are you'll find a user forum or a vendor support page that addresses your issue.

5. Consider the big guns. When your problem is serious and the manufacturer's support is useless or your machine is out of warranty, you may need to call in the pros. Best Buy's Geek Squad (800/433-5778) will try to fix your computer no matter where you bought it or whose name is on the outside of the box. But its prices can be a little scary: Phone support ranges from $30 per incident for simple stuff, such as installing software, to $80 for complicated problems, such as virus infestations. Onsite support starts at $129 and goes up, depending on exactly how big a mess you've gotten yourself into.

You can also subscribe to Ask Dr. Tech (800/275-3783), which charges $24 per month for phone support, while onsite repair plans start at $39 per month. If your machine is still covered under the manufacturer's warranty, having someone else work on it could void the agreement, so use this option as a last resort.

Avoid crashes with Media Center in standby mode

The icy hand of standby mode

Most desktop users learned long ago to steer clear of standby mode, while notebook users tend to avoid it unless absolutely necessary. But Media Center PCs live and die by standby; it's the TV equivalent of off. Unfortunately, every time you put your system to sleep, there's a risk it'll wake up...dead. OK, maybe not dead, but crashed--and therefore unable to record scheduled shows. Sometimes the problems are less severe, such as a lost Wi-Fi connection. Even so, it's enough to make you long for your old VCR. At least it never crashed.

While there are steps you can take to minimize problems, we've yet to encounter a crashproof system.

Steps to overcome or prevent problems.

1. Ditch Wi-Fi.


System crashes can keep Media Center from recording TV shows. Regular rebooting can keep problems to a minimum.
Media Centers with built-in (or PCI card-based) Wi-Fi tend to have fewer problems than those that rely on external USB Wi-Fi adapters. For whatever reason, USB devices and standby mode don't always cooperate. But even onboard Wi-Fi can get stuck in the mud, leaving you without access to Internet radio, EPG updates, and so on. The solution? Ditch Wi-Fi and run an Ethernet cable from your Media Center to your router or modem. Either that or...

2. Reboot regularly. We've noticed that standby-related crashes and Wi-Fi outages tend to occur after our system has been running for several days. By rebooting regularly, we've been able to reduce the frequency of these problems. You can automate this process with a utility such as AutoShutdown (www.barefootinc.com), which will resume and restart your system at a scheduled time. (Just make sure that time doesn't conflict with a scheduled recording.)

How not to get hacked

It's important to know how not to get hacked. The following details the layers of security you can place on your wireless network, as well as the effectiveness of each layer.

In some ways, securing a network is like the security on your home:

  • Leave the front door wide open. Seen by curious honest people and criminals alike as an open invitation to enter. See, it even says ‘Welcome’ on the doormat!
  • Shut the front door. This will keep out an honest person, but a crook wouldn’t be deterred, as they’ll walk right up and try the handle.
  • Lock the front door. This will again keep out the opportunist thief who will only try the door handle or climb in open a window to see if he can get it. Luckily most criminals fall into this category, so lock your door!
  • Bolt the door with deadbolts, bars on the windows, and alarms. It takes a lot more to keep out the determined criminal who, with a little equipment and know-how, might pick the lock, disable your alarm, or break your whole door down!

Wireless security falls into the same categories:

Leaving the door open: an open invitation

  • Broadcasting a default SSID
  • No MAC filtering
  • No encryption
  • DHCP switched on/No access controls

Shutting the door:

  • Changing the SSID (the name) of your network and disabling SSID broadcast. The determined hacker can discover this, so it merely protects you from the opportunist who’s in a hurry.
  • Disabling DHCP/Access Control. This will not stop a hacker with even minimal knowledge, as there are many tools which will sniff out available IP addresses on your network
  • MAC address filtering. A hacker with only a little know-how will be able to clone your MAC address--and see everything you see on your network.

Locking the door

  • WEP: Wireless Encryption Protocol can be hacked in seconds using free tools that are widely available.

Bolting the door

  • WPA: A randomized pre-shared key of at least 10 characters would take half-a-million years to crack. More info about this here. (Note: A random key means that it shouldn’t be a word that exists in any dictionary (hackers have extensive dictionaries that include all common passwords, English words, nicknames, and misspellings of words. This is called a “dictionary attack.”) A random key is a meaningless mix of lower- and uppercase letters and numbers, and sometimes special characters like punctuation, depending on whether your router supports it). If you’re not sure how to get a random key, you can generate a simple WPA key online on Kathies Website or a more complex one here. You can also get software that will generate a key for you (type “software generate wpa key” into your favorite search engine).

It’s best to build up each type of security in layers, checking that all devices can connect and communicate at each step before adding another layer. Make sure you read your router’s manual to ensure you’re storing the settings correctly (some routers require you to save the settings each time you make a change or the changes will be lost).

Tricks for installing a wireless router

The trick to successfully installing your router is to read the manual. Every router is different; even two models from the same manufacturer can have significant differences. Familiarizing yourself with the manual will help your success in the long term.

There are two steps to installing a wireless router:

  1. The first is hooking it up and switching on the wireless aspect. You need that wired connection first so that you can set up the wireless aspect.
  2. The second part is setting up your broadband connection. That is usually just a case of pointing the DNS to the modem. Most setup installations will guide you to do this. Of course, this is assuming you have a broadband modem and not an integrated wireless router and modem in one. If that’s the case, you’re going to have to hit the books…and read the manual!

One of the things that freaks people out most is the fear of putting a wrong setting into the router. Don’t worry. There is always a reset option that will allow you to easily take it back to the factory settings.

Also, always be sure to make notes about what you’re doing every step of the way. That way you can easily go back on what you just did.

Protect your wireless network from hackers

TALES FROM THE CRYPTOGRAPHER

It would send chills down your spine to learn how easy it is for others to connect to your Wi-Fi network and put your computers under their spell. If your computer has been acting funny lately, working fine at times while slowing to a crawl at others, it may have crossed over to the dark side and could be spamming your friends and scamming your parents.

A home network brings many benefits, but it can also expose new evils. Both your Internet connection and your wireless router are potential points of entry for the bad guys. Hackers can probe for your computers over the Internet and turn them into zombies if they are unprotected. Worms and viruses can slither their way through your network, burrowing more holes into your PC than a maggot-infested corpse, and the thief parked on the street where you live can set up shop with the help of your Wi-Fi connection.

Here are a few tips that will keep hackers and freeloaders at bay.

1. Use encryption to protect your wireless network. It sounds trivial, but consider this: wireless data is transmitted over the air. This makes it far more exposed than data transmitted over a cable. To hack into an Ethernet network, you either need to force entry through an Ethernet connection or you need access to the Ethernet cable, which you can lock behind a door; but to pry into a wireless network, you need only be within range. A would-be intruder can park in the street where you live and do her dirty work from the privacy of her car, without risking the unpleasantries of breaking and entering.


Use a passphrase to configure WEP.
You can protect your wireless network by encrypting it. Virtually all Wi-Fi gear supports an encryption scheme called WEP (Wired Equivalent Privacy). WEP scrambles data transmitted over your network, making it difficult to decipher. Even better, setting up WEP is easy. In most cases, you merely enter a passphrase into the configuration settings of each device on your network. The devices use the passphrase to generate a WEP key, which is used to encrypt and decrypt data transmitted over the network.


Configure the computers on your network with static IP addresses.


2. Lock down your LAN. An always-on broadband connection is convenient, but it's also a magnet for hackers and script kiddies, giving them a target that is open 24/7. You can use a firewall to thwart attacks on your network that use your Internet connection as their point of entry. Most wireless routers come with an integrated NAT firewall. NAT stands for network address translation and is used to hide the IP addresses of the PCs on your network behind your router's IP address. From the Internet, your network appears to consist of only one device, your router. This makes it more difficult for intruders to identify the computers on your network. NAT, however, is relatively dumb. It maps the addresses of the computers on your network to the IP address of the router, but it doesn't inspect the data inside the packets passing through your router. For that, you need a second firewall that performs stateful packet inspection, or SPI. An SPI firewall can determine if an incoming data packet is a legitimate response to a request from one of your computers. Not all routers include an SPI firewall, so keep a lookout for it when you buy your gear.

3. Don't make it easy for criminals. Most consumer networking gear is designed to be easy to use out of the box. Easy setup might leave you with a warm fuzzy feeling after the initial setup, but a foolproof setup routine can also leave your network vulnerable to unwanted visitors. For example, routers use DHCP, dynamic host configuration protocol, to automatically handle the IP address information for the computers on your network. But handing out IP address information automatically makes it easy for unwanted guests to join your network. Consider manually assigning static IP addresses to your computers and turning off your router's DHCP server. To manually configure an IP address, right-click the Network Neighborhood icon and select Properties. A window appears listing your network adapters. Right-click the adapter you use to connect to your LAN and select Properties. In the "Local area connection properties" window that appears, select Internet Protocol (TCP/IP) and click the button marked Properties. This window allows you to use a prespecified IP address, subnet mask, default gateway (in this case, your router), and DNS server. Check Wednesday's nightmare for more information about assigning IP address information.

If you have a wireless router, it probably advertises its network name, or SSID, at regular intervals to any device within range, making it easy for others to join your wireless network. Some routers let you turn off the beacon that puts your SSID on the air for everyone to see. Since your computers presumably already know your wireless network's SSID and have profiles instructing them to use it for their connection, consider turning off your router's beacon. Though not all routers let you turn the beacon off, many do. Check the router's browser-based configuration tool for a beacon switch.

Optimize your router for a stable wireless connection

HOUSE OF SCREAMING RADIOS

Say you're approaching the end of a large download, and in the middle of a Skype call to clients in China, without warning, your Wi-Fi connection drops, leaving your download and VoIP call in limbo. You retry the wireless connection, but your router, though blinking contentedly in your den, seems to be off the air. Two hours later, for no apparent reason, your Wi-Fi connection miraculously resurfaces.

Wireless networking can be a blessing and a curse: great when it works and a mind-numbing frustration when it doesn't. A common complaint among many who have moved to Wi-Fi is that their wireless connection mysteriously fades in and out.

These steps will help you create a stable, always-on wireless connection.

1. Change channels. Interference is a likely cause of intermittent connections, such as the one described above. All 802.11b and 802.11g networks operate at 2.4GHz, in a small swath of spectrum once used primarily by ham-radio hobbyists. Today, these radios, plus other Wi-Fi gear, Bluetooth devices, cordless phones, microwave ovens, baby monitors, and wireless surveillance equipment, all crowd the spectrum. When these devices compete for the same airspace, they interfere with each other, potentially blocking each other's signals. Luckily, there are ways to sidestep and minimize interference in many situations. In the United States, 802.11b and 802.11g devices can be configured to operate at any one of 11 channels. Unfortunately, these channels overlap with adjacent channels, so you have only 3 nonoverlapping channels at your disposal: channels 1, 6, and 11. If you and your neighbor both have a wireless network, both of which are set to channel 6, you may experience interference. You can remedy the problem by resetting your wireless router to a different, preferably nonoverlapping, channel, in this case, either 1 or 11.


A power-line access point can help you expand your wireless network.
2. Replace your cordless phone. Cordless phones are among the worst sources of interference for wireless networks. They tend to transmit at a higher power output than Wi-Fi gear, making them louder and therefore harder to talk over, and they tend to transmit frequently, especially when the handset and base station are separated. Some 2.4GHz cordless phones let you select a channel, in which case you can try separating the phone's frequency from the frequency of your wireless network. For example, set your phone to channel 1 and your wireless router to channel 11. If your phone doesn't let you select a channel, try putting some distance between your phone and your router. Generally, it's not a good idea to place a cordless phone next to a Wi-Fi router. If this doesn't help, consider replacing your 2.4GHz phone with a 5GHz phone. This way, your phone and network won't be sharing the same airspace and won't interfere with each other.

3. Expand your wireless network. The farther you are from your wireless router, the greater the potential for interference to block or to slow your connection. For example, you may be able to connect just fine in your house, but on your patio, you may have an intermittent connection that disappears whenever your neighbor is using her cordless phone. The signal on your patio may be too weak to cope with the interference coming from the house next door. You can strengthen the connection with antennas or repeaters, as discussed in Monday's nightmare, or you can use a power-line bridge to import the connection from your router to your patio and feed it into a power-line access point. Instead of the weak signal from your distant router, you now have a strong signal from an access point placed right where you want to buttress your coverage area.

Reduce interference on your wireless network

One of the biggest reasons for wireless interference is the use of 802.11g or 802.11b networks and 2.4GHz cordless phones. Router for those networks and 2.4GHz phones operate in the same frequency, and they're competing with each other. This is exacerbated by the fact that they're in the same room. Interference from wireless products in the 2.4GHz frequency is a known issue for 802.11g/b networks; even baby monitors and microwave ovens have been known to wreak havoc on Wi-Fi networks.

You can try a number of things for free, or you can pony up for a new phone. First off, try moving the phone's base unit into a different room from your router/access point. Also, try switching channels on router/access point. If these suggestions don't work, you can invest in a cordless phone that uses a different frequency than your wireless network: 900MHz or 5.8GHz.

How to tell neighbors you can see their Wi-Fi

It’s a difficult question: how to tell your neighbors you can see their wireless network. I’ve heard stories from a few folks who’ve told their neighbors that they could see their Wi-Fi connection and the neighbor reacted as if they had been looking. Seeing is very different from looking!

Most computer users don’t have the faintest idea that the connections between their computers will be visible to other people, and while it’s understandable that they will react with horror, it’s quite common for people to misunderstand and think that you’ve been deliberately spying on them.

One guy I know got into a fistfight, so caution is definitely advised when broaching the subject!

Who's using your wireless? Find out

How to know whether your neighbors or others are using your wireless network is rather complicated. If your neighbors are experienced Wi-Fi hackers, you might not be able to tell at all. If they’re just stealing your Internet connection, you may be able to tell from the logs on your router. You could look for logs such as current LAN clients, connection or status log, or connected MAC addresses.

Check MAC ID addresses

To find out who’s on your wireless network, you’ll need to start by taking inventory of all the devices that are meant to be connected. Find out their MAC IDs and their IP addresses (if they’re static).

To find out the MAC ID/IP address on a PC, click the Start menu and choose Run. Type cmd and click OK. In the screen that opens, type “ipconfig /all” (without the quotes) and hit Enter. The MAC address will be shown as the “physical address.”
Once you know the MAC addresses of each of the PCs on your network, you will recognize any addresses that don’t belong under the screen that shows the MAC addresses of current connections.

Check IP addresses

Likewise you may be able to see how many IP addresses have been dished out by the DHCP server. If you check the IP addresses of each of your PCs, you can see if other IP addresses have been served.

To find out your IP address from the Start menu, click Run. Then type in cmd and click OK. In the screen that comes up, type ipconfig which will display the IP address for that computer. (Bear in mind, however, that if the PC is set to auto detect settings, then the PC’s IP address will change the next time the computer is rebooted or switched on. Sometimes previously served numbers have not yet expired, so you may think someone is connected when they are not.)

Dealing with intruders

If you do find someone using your connection, they may well not be doing so maliciously or even knowingly. Sometimes people can’t tell which is their own connection and they may honestly believe that they are using their Wi-Fi router rather than yours. The best way to deal with this is to set up your own security and maybe you can help them find their own router!

The optimal solution is to set up a strong password using WPA and change it regularly. Once your network is functioning, you can switch off the SSID broadcast (which prevents it from advertising the name of your network) so it would effectively disappear as far as your neighbors are concerned, and the first you might hear of it is when someone complains that their Web connection has disappeared.

WinRAR: Free up some room on your hard drive

Sure, WinRAR is perfectly suited for prepping files for upload and decompressing them after a download, but don't overlook the many other possibilities of compression. Files you don't use every day or week can be compressed to great effect (especially Word docs, databases, and any other text-based file)--and that means more room on your hard drive for Unreal mods and new music, right? Make sure you use the "Best" setting for this project. It's slower, but you'll get better compression than with "Normal" (which is more suited for frequent backups). WinRAR has the added advantage of enabling "solid" archives, a special, high-compression method that crams files into one continuous data stream. (Just be warned: solid archiving takes a long time, and if there's any damage to the archive later, you could have more difficulty recovering data.)

Record Your Own Ringtones

What you'll need:
• In this project, you need a voice recorder application on your smartphone.

Record an audio clip
Symbian OS/S60 phone: Go to the main Menu and open the Media folder (or Office folder). Launch the Recorder application.

Just in case you want to transfer the recorded clips to your computer for further mixing, define the default storage device in the Recorder application. Open the Options menu and select Settings. If Memory Card is not selected as the Memory In Use, push the selection key to change the value to Memory Card.

Back in the main screen, highlight the red Record button. Push the selection key, and the recording will start. Hit the Stop key to end it.

Windows Mobile phone: Go to the Home screen and push the Start key. Locate the Voice Notes (Voice Recorder) application and open it. You may see an empty screen, but it means only that you haven't recorded anything yet.

When you are so close to the audio source that the phone microphone can pick up the sound, push the Record key. End the recording by hitting the Stop key.

Although you can record as long as there is memory space available, try to limit the recording to 10 to 60 seconds. Windows Mobile phones record audio in WAV format, which tends to result in large files. A long recording will take plenty of memory space, and your phone may not be able to play a lengthy tune anyway.

Other phones: Open the recorder application and record an audio clip.

Name the tune
Symbian OS/S60 phone: In the Recorder application, push the Options key and select Rename Sound Clip. Type a new name for the tune. You can change the name of the last recording only.

Windows Mobile phone: When you are in the main screen of the Recorder, highlight a recording in the list. Open the Menu and select Rename. Type a new name for the tune.

Set the recording as your new ring tone
Symbian OS/S60 phone: With the Voice Recorder on the screen, open Options. Select Go To Gallery. All the recordings you have saved can be accessed from the Gallery. You should see a list of recorded tunes. Highlight a recording, open Options and choose "Set as ringing tone."

Windows Mobile phone: When you are still in the Voice Recorder, highlight a recording in the list and open the Menu. Select Set As Ringtone.

If your phone menu doesn't show the Set As Ringtone choice at all, you have to set it manually. Go to the Home screen, push Start, and open File Manager. You have to move the recording from the folder /Storage/My Documents/Notes to the folder /Storage/Application Data/Sounds. Then, go to the Start menu and launch Settings. Select Sounds, open Ring Tone, and pick up the recorded ring tone.

Store your passwords safely

If you are an average PC user, you probably have more than 14 different passwords to remember and that you use on a regular basis. You will have a password to access your PC, a password for your favorite shopping Web sites, passwords for your e-mail accounts, and another dozen or so for a variety of Web sites and applications.

An open-source software product called PasswordSafe is a good example of a small, secure application for storing your passwords in. All your passwords are safely and securely encrypted in a file so that you need to remember only one password.

Using PasswordSafe to generate a random password.

If you keep all your passwords in an application such as PasswordSafe, make sure that you keep a backup of the password storage file in a safe place and update it regularly in case you suffer a PC crash and lose your data. Another advantage of using an application such as PasswordSafe is that you can use it to generate secure passwords automatically.

For instructions on creating a password that’s hard to crack, see the tip Three simple steps to a secure password.

Make Firefox go fast

Here are a few steps you can perform to speed up Firefox. Back to performance basics first, though: the user is the slowest thing attached to the computer. Better use of Firefox's features will speed up the user, so be sure to read the rest of the hacks in this post.
Fix dial-up modem bottlenecks
Any dial-up modem you use is the slowest network hardware you have, so tune it wisely. Make sure any modem connection is running as close as possible to the maximum speed for POTS (plain old telephone system) phone lines. That line is usually a 64Kbps service (unless you're stuck on an ancient analog exchange). No one gets every drop of 64Kbps out of it, unless they pay a fortune for ISDN, but you should get 53.3Kbps at least.
If you're using Windows, your modem driver and chipset should support the latest compression standards now available. Update the modem and the modem's Windows driver directly from the chipset manufacturer. Look on the modem card to see who made the chips; don't bother with who made the card. If you buy a cutoff switch that lets you isolate your answering machine, fax, and telephone gear while you're on the Internet, you won't strain the line voltage as much, and you'll have less noise causing error-correction delays.
If your connection is still slow, call your telephone provider and complain that their voltages and noise filters are all wrong; they can test and adjust from their end. Call Microsoft and complain that Windows hasn't tuned your PPP connection correctly. Call your ISP and complain that their modem bank isn't negotiating the best possible speed. None of that will do you much good, but it's nice to vent sometimes.
Move to broadband
If you're stuck on dial-up, the biggest performance plus you can get from Firefox without using caching is to turn images off. That's in the Options dialog box under Web Features. Turning off images might reduce your Web experience to an unacceptable low, so it's a dramatic step. You can also ensure that Web pages are checked for updates only once per browsing session, instead of every time you look at them. In About:config, find:
browser.cache.check_doc_frequency /* set it to 0, normally 3 */
This preference change shouldn't affect you much if you're just surfing idly. If you spend a lot of time with online message boards or similarly intensive Web-based applications, it might cause confusion, though, so avoid it in that case. One possible compromise is to create a separate "I'm not working" profile and turn the preference on in that profile. Use that profile for recreation only.
Some of the Firefox ad-blocking extensions prevent advertising images from being downloaded, which is a further performance-saving feature.

Got a virus/spyware infection which is difficult to remove?

If your system has got a stubborn infection(SPyware, virus or any kind of malware), you could try a system restore and hey!presto the infection is gone(or strictly, speaking you've gone back in time and the infection is history!). Of course, you should then perform a deep scan of the system since the virus/spyware/malware will still be at the system restore point. Some good tools would be hijack this and any free spyware tool! Watch out if you've installed any kind of software recently since it will be gone once you've made a system restore. Of course, this will work only in Windows XP. It worked out pretty well for me when my system had one of the worst spyware infections.Good luck!","If your system has got a stubborn infection(SPyware, virus or any kind of malware), you could try a system restore and hey!presto the infection is gone(or strictly, speaking you've gone back in time and the infection is history!). Of course, you should then perform a deep scan of the system since the virus/spyware/malware will still be at the system restore point. Some good tools would be hijack this and any free spyware tool! Watch out if you've installed any kind of software recently since it will be gone once you've made a system restore. Of course, this will work only in Windows XP. It worked out pretty well for me when my system had one of the worst spyware infections.Good luck!

Improve picture quality by using interlaced instead of progressive

While it may seem counterintuitive, many HDTV owners may experience better image quality by using an interlaced signal rather than progressive. The reason for this is that the deinterlacing--that is, the processing that converts a 480i signal to a 480p signal--of the Philips MCD702 is poor. Since every HDTV does its own de-interlacing for interlaced material, in this case it's probable that your TV's de-interlacing performs better than the MCD702's. Whether or not an interlaced signal will look better depends on the TV, so the only way to find out is to try both and see which looks better.

Optimize your PC for gaming

You can have the best, fastest PC available and still find you’re having troubles running games if you don’t spend time optimizing your system to get the best possible gaming experience.

Programs that have been running can cause your PC to run slower than it should because they take up memory and don’t clean up properly after themselves. You might not notice this effect normally but when you try to play a game where every second counts, the effect becomes noticeable.

A PC that’s not been defragged regularly will also become slow over time. This is because the data is spread across the hard drive. This has two negative effects of performance:
  • The system has to work harder to find files because they are scattered over the surface of the drive (even a single file can be made up of lots of smaller fragments).
  • The system has to work harder to find space on the disk to write new files.

Regular defragging can have a huge positive effect on your PC.

How to find a Vista-compatible graphics card

ATI, Nvidia, Intel, S3, and VIA have listed their Vista-ready gear.

My advice with regards to graphics cards would be to make sure that you don't buy something that's too close to the bottom of any of these lists if you want good performance, and to buy mid-range gear if you want good performance without having to take out a loan.

See related tip: Why Vista needs a high-end graphics card

Find out if your PC is ready for Vista

You can scan your system for Windows Vista compatibility by using CNET's Windows Vista Upgrade Advisor. This free service from CNET and System Requirements Lab looks at your computer's hardware and system software to determine whether or not your current system is adequately configured to run Microsoft Windows Vista.

Each of your computer's components is evaluated against CNET's own recommended Vista requirements, and suggestions are provided on how to update or upgrade each component that does not meet CNET's recommended specs for Vista.

Start the Windows Vista Upgrade Advisor from CNET here.

Partitions - Prepare for Reformatting

One thing I have noticed isn't mentioned in the "backup" section of tips is partitioning. You can use partitions to ease the backup of your data on one partition and make it more easy for a total format and reinstallation of the OS on another partition. For example, my current hard drive is a 40GB (yeah, really small) and is partitioned into two 20GB drives. One is for program files and Windows, and the other for all my data. When backing up, you need only to backup your data partition as you can reinstall Windows. Another thought: A second hard drive (prefer external) with similar partitioning. On one partition backup the data partition of the first drive. On the other partition, make an image of your OS with drivers and major applications installed. That way, you can be up and running quickly, even if you have to reformat your OS drive.","One thing I have noticed isn't mentioned in the "backup" section of tips is partitioning. You can use partitions to ease the backup of your data on one partition and make it more easy for a total format and reinstallation of the OS on another partition. For example, my current hard drive is a 40GB (yeah, really small) and is partitioned into two 20GB drives. One is for program files and Windows, and the other for all my data. When backing up, you need only to backup your data partition as you can reinstall Windows. Another thought: A second hard drive (prefer external) with similar partitioning. On one partition backup the data partition of the first drive. On the other partition, make an image of your OS with drivers and major applications installed. That way, you can be up and running quickly, even if you have to reformat your OS drive."

Get cool gadgets on your Vista screen

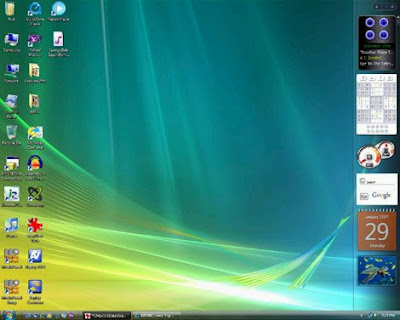
In this tip you’ll learn how to add and configure gadgets using the Windows Vista Sidebar. The Sidebar occupies the right or left end of your screen and serves up a clock, calendar, newsreader, weather gauge, and other useful items called “gadgets." You can add, remove, and reorganize these mini-applications or gadgets as you please to create exactly the Sidebar you want. Here’s how.


First, decide if you want the Sidebar to be a permanent fixture on the desktop or something that stays hidden until you mouse over to the side of your screen. Right-click an unoccupied area of the Sidebar, choose Properties, and then check or uncheck “Sidebar is always on top of other windows.” (This is also where you decide if the Sidebar should occupy the right or left side of the screen.)

The Windows Vista Sidebar, displayed on the right side of the desktop.

To remove any of the existing gadgets from the Sidebar, mouse over it, then click the little close-application x in the corner. To change the settings for a gadget, click the little wrench instead. You can also drag and drop a gadget to a different location on the Sidebar, or drag it off the Sidebar altogether and position it somewhere else on your desktop.

To add gadgets to the Sidebar, click the plus sign at the top of it. You’ll see a dozen or so choices; drag any of them to the Sidebar. However, there are hundreds more available online. Here’s a partial list:

  • Live Clock
  • Amazon Search
  • iTunes Songs
  • Pong
  • WeatherBug
  • Hangman
  • Video Player for YouTube
  • Bible verse of the day
  • Google Searcher
  • HTML Sandbox

Click the “Get more gadgets online” link to see a complete list. There are literally hundreds of gadgets from categories including fun and games, search tools, security, and more. These aren’t drag-and-drop additions, however; you’ll have to download and install them first. Fortunately, most gadgets cost nothing.


Save yourself from spyware with System Restore

No matter how vigilant you are, you may wake up one morning and find your PC overrun with pop-up ads or your browser hijacked by a piece of spyware. Windows System Restore, found in Windows XP, offers a quick and easy way to remove such a spyware infection--if you catch it early enough.

Whenever you install a new piece of software or make a major change to your system, you can create a restore point in Windows, which records your system configuration before the change. This works like a system-wide undo, letting you fix any problems that a new piece of software or hardware or something else has caused. System Restore shouldn't affect any of your data, only your system configuration, and in any case, the changes you make are completely reversible. You can turn on System Restore so that it automatically creates restore points daily and before you install software. Or if you know you're about to install a new program or make a change, you can manually create a restore point.

  • To access System Restore, click Start > All Programs > Accessories > System Tools > System Restore. If you have System Restore turned on, you'll be presented with a calendar showing available restore points. If not, you can choose to create one before you install a new app.
  • If you've been using System Restore and suspect you've accidentally downloaded spyware, just select the most recent available restore point that you believe predates the introduction of the spyware. Remember, this will undo all changes made to your system, including any software updates, though it won't delete documents you've created since the restore point. So be conservative; you can always try again with an earlier restore point.
  • Once you've successfully banished the spyware and restored your system to good working order, you may want to delete your saved restore points so that you don't inadvertently use System Restore and reinstall the spyware on your system. To do this, right-click the My Computer icon on your desktop, click the System Restore tab, click the check box next to "Turn off System Restore on all drives." Click OK, then repeat the process, unchecking the box to turn System Restore back on.
  • If you're about to download software that might be suspicious and you don't have System Restore turned on (it can be a bit of a system hog), just create a restore point before you install. Click System Restore, then Start > All Programs > Accessories > System Tools > System Restore, and choose "Create a restore point." Follow the prompts and install without fear. If something goes wrong immediately or after a few days, just restore to the point you created.

Speed up shutdown times

It's not only start-up that you'd like to speed up; you can also make sure that your system shuts down faster. If shutting down XP takes what seems to be an inordinate amount of time, here are a couple of steps you can take to speed up the shutdown process:
  • Don't have XP clear your paging file at shutdown. For security reasons, you can have XP clear your paging file (pagefile.sys) of its contents whenever you shut down. Your paging file is used to store temporary files and data, but when your system shuts down, information stays in the file. Some people prefer to have the paging file cleared at shutdown because sensitive information such as unencrypted passwords sometimes ends up in the file. However, clearing the paging file can slow shutdown times significantly, so if extreme security isn't a high priority, you might not want to clear it. To shut down XP without clearing your paging file, run the Registry Editor (click Start > Run, then type regedit in the Run box) and go to: HKEY_LOCAL_MACHINE\SYSTEM\CurrentControlSet\Control\Session Manager\Memory Management
  • Change the value of ClearPageFileAtShutdown to 0. Close the Registry, and restart your computer. Whenever you turn off XP from now on, the paging file won't be cleared, and you should be able to shut down more quickly.

Note: Please be careful when editing the Registry; you can do a lot of damage here. Don't change or delete anything unless you know exactly what it is.

Thursday, April 12, 2007

Buying a graphics card for PC gaming

The most vital component of a gaming rig is the graphics card. This component can make or break a gaming PC. I recommend that you don’t skimp here and never buy a cheap card. Go for a mid-range card at least. At the same time, don’t be tempted to feel that you must go for the fastest, most expensive card on the market. The top-end cards command a premium price and are nice if you can afford them, but I’d never recommend going into debt for one.

Also, always, always install the latest drivers. The drivers that come on the disc or with Windows are old before you get them. Download the latest drivers from the manufacturer’s Web site for best performance

Video cards are the highest priority. Having the wrong video card can mean that a game doesn’t play well, or doesn’t even play at all!

Add RAM to boost gaming performance

One of the easiest and best upgrades that anyone can carry out on their PC is to upgrade the RAM. It’s fast, cheap, and the difference that you’ll notice in your system is obvious. No matter whether you go up from 256MB to 512MB, 512MB to 1GB, or even 2GB to 3GB, the difference is huge. The bigger the jump, the bigger the difference.

Adding 1GB of RAM to a machine can literally make it feel like a new PC.

I recommend that if you are a serious gamer, you need 1 or 2GB of RAM. Anything less is holding you back! But unless you are running a 64-bit OS, going over 3GB is a waste as the system won’t be able to see it.

Planning your Dream PC

Don't bust the budget

A dream machine can have many incarnations, depending on how much money you truly are able to put into it. At some point along the configuration process, you’re going to ask yourself the question, “Do I really need this particular item in my machine?” It can be a high-end video card, HD-ready display, etc. The first thing you need to decide on is essentials.You should write (or type) the absolute must-haves for your machine. This list will differ with everyone, depending on what you’ll be using the computer for. After the essentials are done, then you can start thinking about spending that extra buck on a component that may be a bit frivolous, but you can’t live without it.

Bottom Line: Have a budget and a dollar figure that you won’t go over by more than a few bucks.

Choosing components

The best advice I can give is to choose your components based on a couple things. First, if you have had past experience with a particular brand, whether positive or negative, that should factor into your decision-making process every time you are shopping around again. If you have had nothing but wonderful experiences with ASUS motherboards or Nvidia video cards, that’s obviously going to influence your decision, and that’s perfectly fine. The same goes for negative experiences.

Second, it is essential that you read reviews of products you are interested in. Just because a company has made well-reviewed and popular products in the past, that doesn’t mean they are infallible. Make sure you read reviews from both tech professionals and consumers for the exact product you are looking to purchase.

Also, make sure the components you buy complement each other. For example, if you are planning on taking advantage of SLI [to boost your machine's graphic processing], you want an SLI-capable motherboard. If you are planning on a nice digital speaker system, make sure that your sound, whether it’s integrated or dedicated, has an S/PDIF input.

Bottom line: You want components in your Dream PC to operate as if they were built to do so seamlessly.

Is your PC ready for wireless networking?

Here’s how to find out whether your PC has what it takes to set up a wireless network:

  1. The first thing to check is how your computer connects to the Internet. If you’re on a broadband connection that’s on all the time and you don’t need to dial out to connect to the Internet, you’ll need to check whether you have a broadband modem or a broadband router.
  2. Check with your Internet Service Provider about whether they supplied you with it. Failing that, try typing in the make and model number into a search engine to find out what it is. If it’s a router, then it may be a wireless router.
  3. Next you need to check out your PC to see if it is wireless-network capable. If you look in Control Panel under ‘Network and Internet Connections,’ you can see whether there is any kind of wireless adapter installed.
  4. If you have a wireless-enabled router and a wireless-enabled PC, you’re good to go! You should be OK using the automatic detect settings. If you do need to set a static IP address, choose something like 192.168.1.5 and set the default gateway to 192.168.1.1 and the subnet mask to 255.255.255.0

Note that if your computer doesn’t already have a wireless network adapter built-in, you’ll need to install one for each system that connects to the network.

Run an Internet filter

Many parents out there are worried abt their kids once they have an internet connection at home. from sex, to violence its all available on the internet and worst still most of it is FREE! this is a concern raising the daily stress level of many parents.well i have a few tips on how you can control your kids web activities.lets start with restricting our innocent life from gaining access to such websites.if you are using internet explorer (IE) 5.0 and above, its great place to start. IE has a feature to restrict such websites displaying sex, violence, and many other stuff, only that 90% of the parents are not aware of this great facility provided by Microsoft.steps to a stress free kids life.

1. Open IE.
2. Go to the Tools menu and click on Internet Options.
3. Select the Content Tab.
4. Click on Enable.
5. On the dialogue box, you can choose a rating standard. for each area, you can choose a level to which one can gain access. for sex, nudity, language and violence. select your choice, you can choose to allow a little bit of everything to not allowing anything of such content.
6. Click on advanced tab after you are done with the selection of levels.
7. Enter a password and keep it to yourself. make sure your smart kids cannot guess what it is.
8. Click ok, and close all windows.
9. TEST IT FOR YOURSELF! go to a sex website, and the content advisor will block it, asking for a password.
10. IF THAT HAPPENS BINGO!.

What are Web crawlers?

To find out what content is on your Web site, search engines like Google and MSN Search use programs called Web crawlers. These programs analyze millions of Web pages, then decide which sites and pages are most relevant for various search terms. With good SEO, you can show those Web crawlers that your site is a great one for people who are interested in vintage telephones, as opposed to office telephones or a thousand other telephone-related search possibilities.
Every search engine–Google, MSN, and so on–has its own formula for ranking Web sites, and they keep these formulas secret. Generally, search engines look at a number of factors about each Web site to judge its relevance to a topic and its overall importance. The words and phrases that you use on each page of your site are an important factor. The engines find the keyword weight of the phrases you use–the concentration of keywords on your pages–to determine each page’s relevance to a search term.
Keyword weight isn’t something that you need to worry about: some web publishers try to game the search engines by heavily using certain keywords, increasing the site’s weight for those keywords. Don’t do this; write for people, not search engines.
Also, search engines factor in the links from other sites to your site, including the number of links to your site (that is, its popularity), the text in those links, and the quality of the sites that link to yours

The information in this tip originally appeared in the Search Engine Marketing 101online class.

Identify e-mails trying to steal your identity

You open your in-box and find e-mail from eBay or PayPal, warning that your account has been compromised by identity thieves and that you must log on immediately to verify your information. Sounds scary, right? But here's the really terrifying part: that e-mail is a fake, and so is the Web site it's sending you to. If you follow the instructions and provide your account info, so-called phishers will steal your identity. You may soon find that these scammers have used your data to purchase all kinds of things on eBay you've never heard of, and the sellers are demanding payment. Your eBay reputation and your credit rating will be in tatters. And that's just for starters.

Fortunately, there are ways to fight the phishers:


1. Spot phony e-mail.
Neither eBay nor its PayPal subsidiary will ever send you e-mail with live links inside it, says eBay's Jim Griffith, dean of eBay Education. So no matter how real they may look, be aware that any PayPal or eBay e-mail containing live links is an outright fake (also known as spoof e-mail).


2. Think before you click.
Never click the live link inside such e-mail; if you want to check your account status, manually type eBay or PayPal's address into your browser and log on normally.


3. Make sure the site is secure.
eBay and PayPal use SSL encryption to secure your login info. That means the Web address should start with https: (the s stands for secure), and there should be a tiny, locked icon in the lower-right corner of your browser.


4. Double-check the URL.
Some phishers use foreign character sets to create URLs close enough to fool users into thinking they're on the real site. Make sure the site you're logging on to is really www.paypal.com and not www.paypäl.com.


5. Rat out the bad guys.
Identity theft is a serious crime, and the FBI is actively investigating phishing scams and other activities related to ID theft. eBay is also investigating spoof e-mail. If you get phisher e-mail that claims to be from eBay or PayPal, forward it to spoof@ebay.com and file a complaint with the Internet Fraud Complaint Center.

Wednesday, April 11, 2007

Quick Search The Web with IE 7

Internet Explorer 7’s search tool is no longer limited to Microsoft’s search engine. Now you can use it with Google, Yahoo, eBay, Wikipedia, and many others.
To do this:

  • Click the down arrow labeled Search Options, which is located at the right of the search box’s magnifying glass in the upper right corner of the screen.
  • Click Find More Providers, and then choose the one(s) you want.
  • When the time comes to actually conduct a search, click the Search Options arrow again and select the engine you want from the pull-down list.

The information in this tip originally appeared in the Windows Vista Basics online class.